5 Tips for Increasing Loudness in a Mix
Article Content
Playback loudness is an ever-persistent issue in the world of mixing and mastering. Commercial releases are currently very loud, particularly since the EDM scene flushed through the mainstream market in the late 2000s. And since commercial records sound so loud — well … everyone wants their music loud as can be.
The only issue is that there is a limitation on playback level. A digital file has a hard ceiling called 0 dbFS, and any signal that exceeds this level turns into harmonic distortion, not playback amplitude. In other words, things can only get so high in terms of amplitude.
However, “loudness” is not the same as amplitude. Rather, “loudness” is the perception of amplitude. It’s not how much volume something has, it’s how much volume something appears to have. Therefore when we’re mixing with the intention of the final playback level being very loud, we can customize the way the sounds are heard and cater to that idea.
Now I want to throw a great big caution out there. I spent a long time figuring out how to create a loud mix. And I learned two hard lessons. The first is that by focusing so much on how to make a mix loud, I was taking time away from learning how to make a mix good. They are not the same thing. The second is that loud mixes do not get approved; mixes that feel right to the client get approved.
Don’t go about thinking that because you can make your mix the loudest in the world it’s going to win over clients or help sell records. It won’t. It’s just another skill in the arsenal to create desired results. That said, it’s an essential skill because people want their records to sound like they belong with what’s out there, and what’s out there right now is loud.
1. The Quantity Paradox
In the acoustic world, the more instruments we have banging away, the more energy we put into the air and the more total sound pressure level we get. In the world where we have an amplitude ceiling, this is not the case. Because each instrument takes up some of the total amplitude we can actually have, the more instruments we add the less loud they can actually be.
In the digital world, a single vocal and acoustic guitar can actually get a louder playback level than a complete band. This is particularly true once we add drums to the equation, which I will explain a little more about later. But suffice to say, the fewer instruments we have in our arrangement the louder the record can get. If we’re going for loudness we want to have a minimalistic approach to our arrangement, or we want to push our non-primary elements further back in the mix so the main instruments can appear louder overall.
2. EQ: Fletcher-Munson Curve
Not all frequencies are created equal. The Fletcher-Munson Curve details the way that we perceive loudness when different frequencies are generated at the same amplitude. Our ears are most sensitive to frequency content between 1 to 4 kHz, and we lose a lot of perceived amplitude when we get into the bass range, especially the stuff under 80 Hz.
What does that mean for our loudness? It means that if we emphasize our 1 to 4 kHz range, we can get an overall louder playback level. Of course, this can come with serious drawbacks. That’s the same range that consists of stuff like baby cries, test tones, banshee wails … that range can get harsh and unpleasant pretty quick.
The other big aspect of how the Fletcher-Munson curve may influence our mix is how we handle the bass. In order to get low tones to be heard at equal volume as higher tones, we need more amplitude and therefore they end up taking up more of our total space.
Now, there is a trick for circumventing this to an extent: overtones.
By playing up the harmonics of the bass and kick, we can get more presence with less actual level. For bass guitar, this might mean the 400 Hz-ish range. For kicks and 808s this may involve the 150-250 Hz area. Of course, if we’re playing up these higher tones, we’re conversely downplaying the fundamental tones. We’re not going to get as much punch if we are trading off presence for fundamental tones, but such is the cost of loud playback.
3. Compression: Sustaining Levels
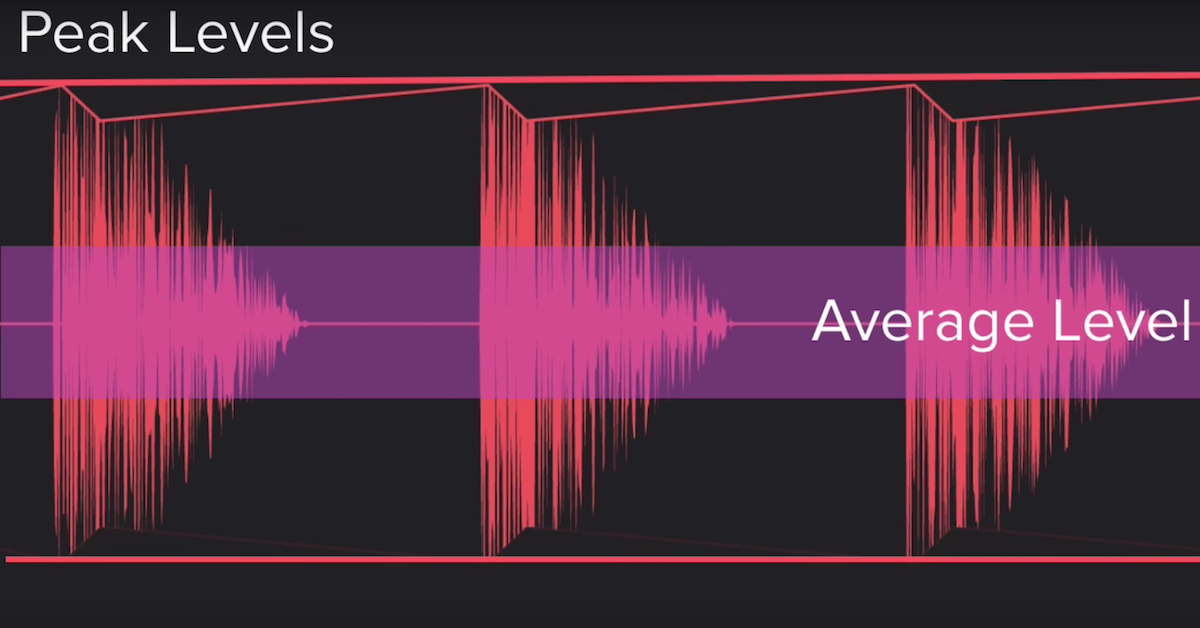
Loudness isn’t just about how we perceive the amplitude of a sound, it’s also about how long we perceive that level. In other words, if we have a sound that hits -10 dbFS and only lasts 1 ms in duration, it will be perceived as quieter than the exact same signal that lasts for 3 ms. This is quantified as the difference between peak level and “RMS” level, or average level over time.
Peak level tells us how much amplitude is generated at the highest point, but RMS describes how much amplitude is generally there. Drums are transient sounds, and they peak and decay very fast. This is why a snare drum will be perceived as quieter than a saw synth even if they peak at the same level. Once we add drums to our mix, our room for total amplitude gets eaten up very quickly. How we handle drums becomes extremely influential on how loud the mix will ultimately get.
We can control our peak levels using compression. Compression effectively takes the loudest part of the sound and attenuates it. We can use this tool to basically turn drums down without losing volume. The drawback is while the drums can appear basically as loud, they will lose impact because those highest peaks have been cut short.
This is true in the overall mix as well. By compressing the overall mix we can make the quiet parts of the sound closer in dynamic range to the loudest parts, which means the overall record is louder. But, again, there are compromises here. The difference between quiet and loud sounds is an important part of groove, contrast, and front-to-back imaging of a record. Compression can kill our groove, can make all our sounds run together, and reduce the 3-dimensionality of our song by reducing the difference between the “front” and “back” of the sound stage.
Lastly, the faster our compressor release time, the more of that average overall level we get. This is why limiters are such a crucial tool in loudness. Fast release times come with pumping and distortion though, so as a general approach, I usually look to find the fastest release time that doesn’t cause pumping or distortion if I’m trying to make a record louder overall.
4. Clarity: Reduce Masking
An important aspect of getting a mix loud is making sure one instrument isn’t covering up another. If an element is getting masked we need to turn it up to be heard, and we quickly lose our space. In addition, if there are extra tones bouncing around our mix, that mud gets exacerbated when we start compressing everything. This means that we are not only losing our total amplitude level up front, we also can’t get away with as much compression at the end.
Keep in mind not everything always wants to be clean and clear. Sometimes we want that extra stuff because there’s vibe or emotion there. But if we want a record to sound loud, clarity is a big part.
Now, masking doesn’t just happen in the frequency realm. It’s about dynamics as well. A common technique for improving the clarity of an element is called “ducking.” Ducking is when one element tells another element to get out of the way (or duck).
This is done using the Sidechain input of a compressor. Let’s say we have a snare and some electric guitars. The electric guitars might mask the snare a hair (snare a hair lol) if they’re big and powerful. We can put a compressor on the guitar buss and set the sidechain input to be fed by the output of the snare. This way whenever the snare hits, the guitars are attenuated. Because this movement happens quickly and subtly, we don’t really hear it as the guitars being turned down. It’s more like the snare just pokes out a bit more when it hits because there’s less in the way.
5. Distortion: Harmonic Energy
Loudness is our perception of sonic energy. This is most clearly heard in terms of total amplitude, but it includes frequency content as well. For example, if we were to play out a sine wave and white noise at the same level of amplitude, which do you think we’d hear as louder? The white noise. White noise carries a lot more energy than a sine wave because there is broadband frequency content.
Distortion adds harmonic energy to a sound. In turn, this adds perceived loudness. This is why elements like distorted guitars and synths found in dubstep music appear loud to us. Tons of harmonic energy.
We can incorporate subtle amounts of distortion into our mix by saturating our clean synths, subtly clipping drums, or mixing distortion into our bass in parallel. These techniques can not only increase perceived loudness but when done well can help texture our sound in a musically compelling way.
Of course, there’s a point in which distortion just becomes noise and gets in the way of the song. When using distortion as a mix tool it’s important to be mindful of where the song is going. If it’s an angry song … ok, distort away. But if it’s not, maybe be wary. There’s also a difference between deliberate, sculpted distortion that has a particular feel and just clipping the master bus.
If we make our elements clear, manage our balances, manage our dynamics, pay attention to the Fletcher-Munson curve, and incorporate tasteful bits of distortion into our mix, it’s not too challenging to get a loud playback.
However, you may have noticed I’ve put a lot of cautionary advice into this article. That’s because mixing for loudness is a fundamentally non-musical concept, whereas mixing in principle is based on the music itself.
In other words, we should be mixing to communicate the record in the best way possible — that’s our number one priority. We don’t really want to make sacrifices to how the end listener will experience the record in order to make the playback level louder … and if for whatever reason we need to, we want to do so sparingly.


