The Complete Guide to Recording Dialog for YouTube, Podcasts & Streaming
02/28/2021
Article Content
The human voice is a unique and complex instrument — not only when singing but when speaking, too. Whether you’re recording dialog for your podcast, YouTube channel or Twitch stream, it can be a challenge to properly capture, edit and mix the voice so that it sounds intelligible, full and natural. Additionally, you may not have the time, budget and (let’s be honest) the desire to do anything other than the initial recording.
In this article, I’ll cover how to get the best sounding dialog possible with limited resources.
The Voice
Let’s start with a quick overview of the most important thing one needs to understand when recording the human voice: the voice itself.
Speech and singing are a result of several different components of the human body working in tandem. Some sounds are generated in the lungs and chest cavity. Others are a result of the resonance of the larynx (which we also refer to as our “voice box”), and still others occur higher up in the anatomy (think tongue, lips, etc.).
Two types of sonic components are important to the human voice, but can cause issues when recording and mixing audio: sibilance and plosives.
Sibilant sounds are the sss, shhh and ch sounds which are certainly essential to the intelligibility of speech. When recording, sibilance can be minimized by having the performer move further away from the microphone. Additionally, you can try placing a pencil or finger in front of the performer’s lips. I recommend having the performer use their own finger.
Plosives are caused by the mouth creating a burst of air during words such as people, power, and please. It’s fitting that the word plosives begins with the letter P, as it is typically the culprit in the generation of plosives. Go ahead and place your palm a few inches away from your mouth and say a few P-words, and you’ll feel the burst of air that I speak of. Microphones don’t like plosives, and such sounds can ruin recordings or, at the very least, leave them sounding unprofessional. When recording, plosives can be minimized by, again, having the performer moved further back from the microphone. You can also place the microphone at an angle (also known as ‘off-axis’) from the performer’s mouth, or a pop filter (which sits between the mouth and the microphone) can be used. A decent pop filter should only run between $10-$30, but if you’re on a shoestring budget you can make your own.
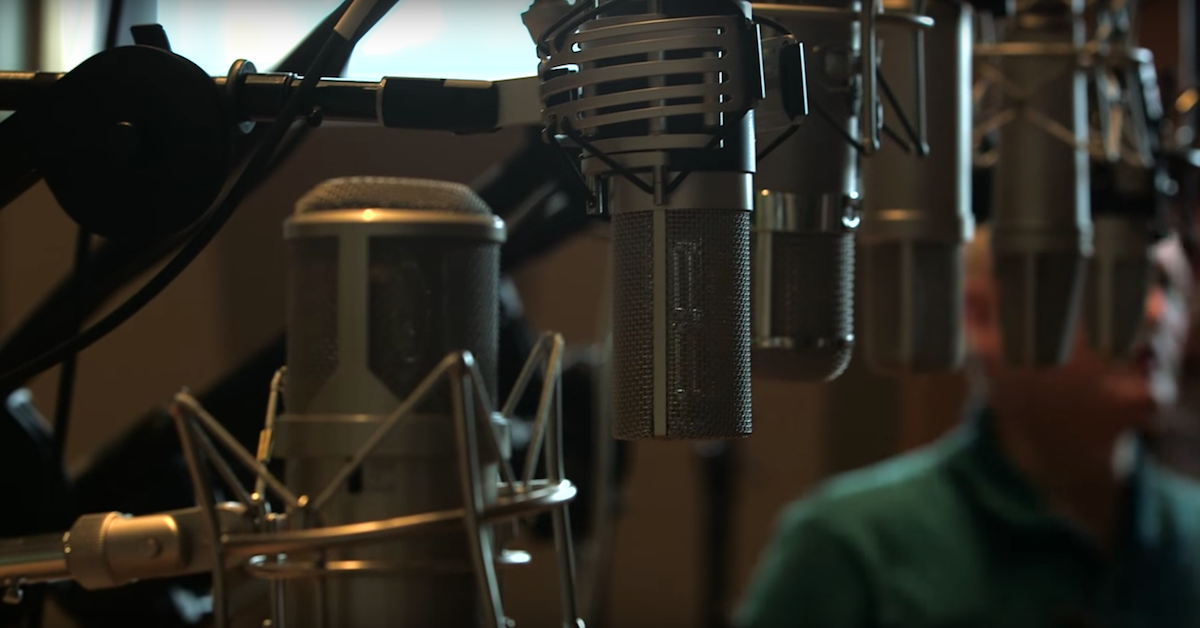
Perhaps the most important piece of advice you’ll find in this lesson is to hydrate before and, if possible, between takes during the recording session. In addition to being conducive for general health, hydration is essential for a pleasant-sounding voice. A dry mouth can make it difficult for performers to enunciate certain words, and can introduce all sorts of nasty sounding artifacts like mouth clicks. I absolutely cannot stand listening to mouth clicks. They can be removed relatively easily during mixing with the iZotope Mouth De-Click plugin, but it’s always better to avoid restoration software if possible. Room temperature water and non-caffeinated teas are my preferred beverages of choice for use when recording my own voice. I stay away from consuming caffeine and alcohol before and during recording as they both tend to dehydrate me, with the latter sometimes causing me to slur.
No two voices are identical, and identifying and adjusting to the particulars of your subject’s voice is essential in obtaining ideal recordings.
The Recording Environment
In the event that you aren’t producing content for your YouTube channel or podcast from a professionally designed and acoustically treated studio, it’s important to make the most of your surroundings. Having a pleasant sounding voice will only get you so far if that voice is recorded in a cavernous, echoey sounding room. Means of improving acoustics include using absorption (carpets and soft panels), diffusion (precisely designed wooden panels) and minimizing both parallel and highly- reflective surfaces. You’d be surprised at the recording quality you can obtain in the comfort of your own home with some minimal and inexpensive adjustments to your environment. Let’s examine a case study.
Comedian and actor Marc Maron records his podcast WTF with Marc Maron in the garage of his Los Angeles home, and it receives over 220,000 downloads per episode — with the show now having reached over 100 million downloads. Granted, sticking a microphone in front of subjects including Robin Williams, Conan O’Brien and Helen Mirren is going to result in some compelling content. Regardless, upon inspecting a photograph of Marc interviewing Barack Obama, I noticed very little in the way of expensive acoustic treatment. There are foam absorbers in the corners of the room, a large rug on the floor, a densely packed bookshelf which can function as a diffuser and shades drawn over the windows to minimize reflections off the glass. The room looks full (some might even consider it messy). There are dozens of pictures hanging on the wall, CDs and mugs strewn about his desk, a printer, guitars, lamps and other stuff surrounding him. These items are minimizing reflections of the voices that might bounce off of flat surfaces and make it back into the microphone.
Marc Maron’s podcast sounds natural. It isn’t stunningly pristine like some of my other favorite podcasts, which include Radiolab and Snap Judgement, but I never find myself distracted by the audio quality. There are low budget ways to create a workable space much like his, and sound dampening methods include the use of blankets, pillows and even recording in a closet.
It’s also important to minimize the unwanted sounds that make it onto your recording. Make sure doors and windows are closed and minimal air conditioning and electronics noises are present when it comes time to hit record. My home studio isn’t 100% soundproofed, so I need to be aware of the occasional jet flying above my house or when my neighbor mows his lawn.
Microphones
So we drank our water to minimize disgusting mouth noises and our room is appropriately decorated to prevent reverberation. What now? Choosing the right microphone within your budget is essential. Beneath I’ll outline different plans of action depending on if you’ll be recording into your computer or into a camera.
To get mildly scientific, microphones are examples of transducers. These are devices that convert one form of energy into another. Microphones capture the acoustic energy created by the human voice and convert it into an electrical signal which can be stored by a recording medium. The two most popular types of microphones are condenser and dynamic microphones. Condenser microphones are clearer, more sensitive and typically more expensive. They also require external power, called ‘phantom power,’ to operate. Dynamic microphones can sound less bright and capture less of the environment in which they are being used.
Going to back to Marc Maron’s WTF with Marc Maron, he’s using tried-and-true Shure SM7B microphones, which are of the dynamic variety. They do a fantastic job of minimizing the sound(s) of the room in which they are placed, which make them a great choice for recording the voice in a minimally treated space. I also use this microphone for my tutorial videos, my YouTube channel and for general music production duties. They cost about $400, so I wouldn’t recommend them to anyone unless they are really serious about content creation and improving the quality of their vocal recordings. They also require a high-quality microphone preamp (more on those shortly) with a good amount of gain, and they benefit from some additional processing including equalization and compression to truly reach their sonic potential. If you’re willing to make these aforementioned investments, you can achieve broadcast quality with the Shure SM7B. A cheaper but still very workable dynamic microphone is the Shure SM58.
Large diaphragm condenser microphones are fantastic on the right source and when used in the right environment. I would hesitate to recommend the $3,200 Neumann U 87 large diaphragm condenser mic, which is partially responsible for “the sound of NPR,” unless you’ve got a professionally treated studio to record it in. I would, however, consider recommending budget condensers such as the Audio Technica AT2020 or AT2035.
Another type of condenser microphone is the shotgun mic, which looks quite a bit different from their large diaphragm counterparts. Similar to large diaphragm condensers, they range in cost from a couple hundred dollars to several thousands. They are known for their very directional pickup patterns, meaning they are designed to capture the sound of what they are aimed at and reject everything else. For this reason, shotgun microphones are popular when capturing on-set production sound. They are also comparatively light and easy to move around. Companies including Rode and Sennheiser make high-quality shotgun mics.
A more affordable and easier-to-use option for those recording into their computer is a USB microphone. These come in many varieties, and it is very likely that their audio quality is superior to camera microphones or mics built into desktop or laptop computers. The Blue Yeti is a serviceable and simple USB microphone.
If you decide to not go the USB microphone route, you’ll need to consider a recording interface. An interface usually provides a way to connect your microphone using an XLR cable. Many interfaces will then be connected to your computer via USB. What used to be possible only by using large, expensive and difficult to maintain recording consoles is now possible with USB interfaces. Generally, the audio quality will be better when using an audio interface than with a USB microphone. Interfaces will also usually provide phantom power to operate condenser microphones. There are hundreds of different interfaces that range greatly in price and quality. A solid and affordable option for aspiring sound engineers, streamers and podcasters is the Focusrite Scarlett 2i2. Interfaces such as this are equipped with microphone preamplifiers that boost the output level of the microphone to be at a more acceptable level. As someone who engineers audio professionally, I use the Universal Audio Apollo x8p and couldn’t be happier. Universal Audio makes several excellent interfaces at lower budgets including the Apollo Solo.
If you are planning on recording directly into your camera, there are microphones built specifically for this purpose. One example is the Rode VideoMicro. This is a compact shotgun microphone which will mount directly on a camera. It comes with a furry windshield to minimize wind noise if you happen to be filming outside, and it is outfitted with an output jack that should be compatible with most current digital cameras. The drawback of recording directly into a camera is that the microphone preamps are usually lower quality than the ones you’d find in a desktop audio interface or a portable audio recorder.
Monitors and/or Headphones
Just as important as the equipment you record with is the equipment you listen with, especially if you’re ultimately mixing your own podcast or YouTube videos.
At the time of recording, I recommend using a decent set of headphones connected to your recording device, whether that be a camera, audio interface or USB mic (some of which have an output jack that you can plug directly into). Good headphones will allow you to hear what your listeners/viewers will hear. I’ve used Sennheiser HD280 headphones for over a decade now, and you’d be hard pressed to find a better set for $100.
If you have the ability to put in some work mixing, the same headphones will do, but I also recommend monitors. The more definition and clarity your monitors have, the better your decisions can be when making adjustments. Companies such as ADAM Audio, Focal and Genelec make fantastic monitors. Similar to microphones, they greatly range in price.

Ready to elevate your ears?
It doesn’t have to take years to train your ears.
Get started today — and you’ll be amazed at how quickly using Quiztones for just a few minutes a day will improve your mixes, recordings, and productions!
The revolutionary Sonarworks Reference 4 software can go a long way in improving how your monitors behave in your environment, and I recommend it to anyone who plans on mixing their creative content in a less-than-ideal space.
Digital Audio Workstations
Also known as a DAW, a digital audio workstation is what most modern engineers use for recording and mixing many different types of media. The industry-standard DAW is AVID Pro Tools, but there are many other affordable, highly functional options including Adobe Audition, Logic by Apple, Cubase by Steinberg and Studio One by Presonus. Free DAWs include Garageband, Audacity and Ableton Live Lite. The Blue Yeti comes with its own proprietary software, Yeti Studio, and can also be purchased bundled together with Studio One.
Each DAW has its own learning curve, strengths and weaknesses. If all you need is to record, edit and mix dialog, then all of the aforementioned software will do.
Ready to Go
At this point, your microphone is set up (preferably on a mic stand) and connected. Don’t forget phantom power when using a condenser microphone. Additionally, don’t underestimate the importance of moving both your subject and microphone around the room. Certain areas in your space may be more reflective, and I suggest doing test takes and then listening back before committing to a spot. Of course, if you are streaming for Twitch, you are beholden to wherever your battle station is set up. I still recommend moving things around your room that may affect the sound. Perhaps you can move a blanket or other type of dampening behind the microphone and off camera. A little trial and error will go a long way in overall quality.
It’s important to use the gain on your recording device to control the amount of signal you want to capture. Most worthwhile recording devices (including cameras) and DAWs will come equipped with meters, which range from -infinity to zero. They allow the user to see how much signal will be recorded. A good rule of thumb is to set the gain so that the average level is -18 dBFS. The most important thing is to prevent amplitude from reaching zero, potentially causing distortion. If you are using a DAW to capture your audio, be sure that the inputs are routed correctly and that your track is record armed.
Once Recorded
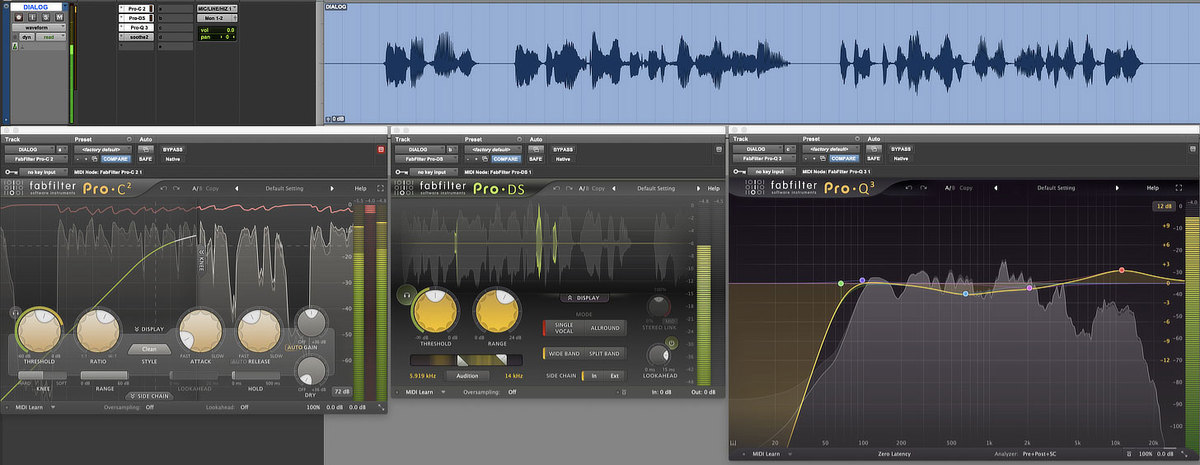
If you are willing to spend the time and effort to put in some work once your content has been recorded, there are lots of fantastic tools out there to polish the audio to sound more professional. Let’s do a quick rundown of the most common types of processors to be used on dialog. It’s worth noting that most entry-level DAWs will come with these types of processors, and many third-party companies sell their own as well.
Equalizers – Equalizers are one of the most effective types of processing that audio engineers use. Humans with ideal hearing can perceive frequencies that range from 20 Hz (20 cycles per second) to 20 kHz (20,000 cycles per second). Equalizers allow a user to boost or cut at certain frequency ranges within this spectrum. If your voice is lacking in low frequencies and sounds thin, you can use an equalizer to thicken it up. I make my voice sound fuller by adding a little bit between 100-150 Hz. Conversely, if your voice is too nasal or bright at certain frequencies you can use an equalizer to attenuate that area of the frequency spectrum. I usually cut a bit out at 600 Hz and 2 kHz in my voice. Equalizers can also be used to minimize unwanted hum or noise, but that task is better suited to audio restoration software.
Compressors – Compressors reduce the dynamic range of signals. This means that they take the loud parts and quiet parts and bring them closer together. This effect can be used to achieve a very balanced sound.
De-essers – I dedicated a whole paragraph to sibilance earlier in this article, but if your recordings still have harsh, unwanted sss sounds, a de-esser may help. It’s a type of compressor that only affects the upper area of the frequency spectrum, so that the level of the sibilance is reduced and the rest of the signal is left untouched.
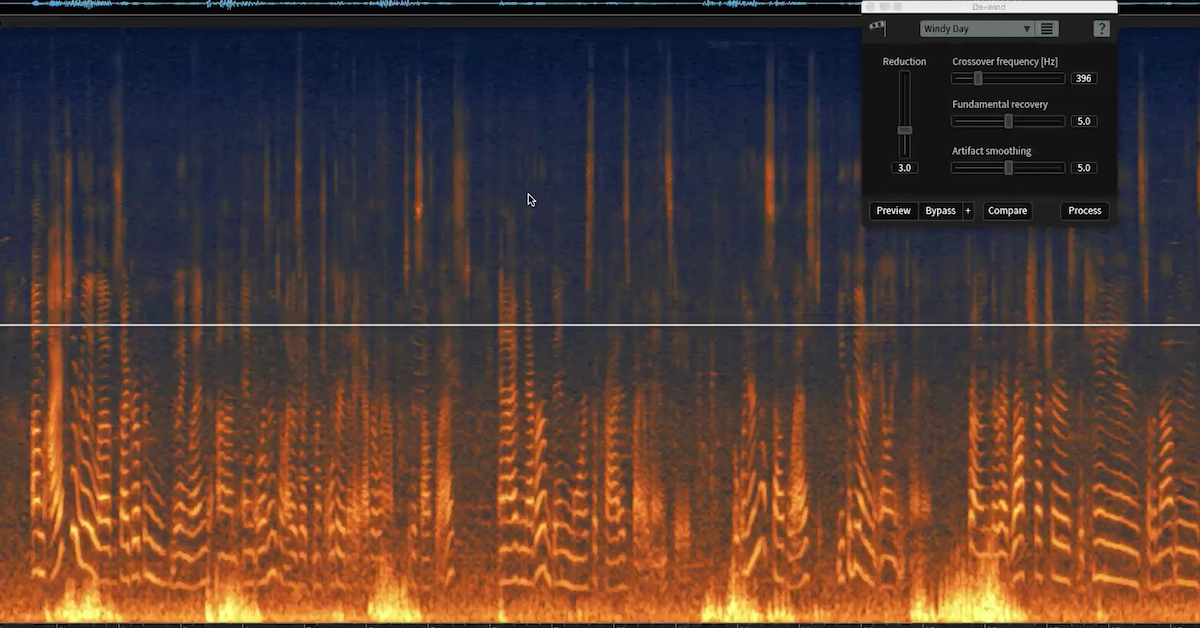
Sonic Restoration – There may be flaws in your audio that are beyond the scope of the aforementioned tools, and I’ll lump the many different types of technology that we use to fix those flaws into the sonic restoration category. I often use the iZotope RX 8 plugin suite to handle these problems. I mentioned the Mouth De-Click plugin; it also comes with De-Wind, De-Rustle, De-Reverb and many other modules that do a great job of fixing problems that were introduced during recording. While these tools are incredibly powerful and have revolutionized post-production workflows, they have a relatively steep learning curve and are no replacement for proper recording technique.
Limiters – Generally one of the final tools used in a production, limiters are types of extreme compressors that allow users to set a ceiling that the amplitude will never pass. They can be used to bring up the overall level of a final mix and prevent unwanted distortion or clipping.
In addition to these plugins, we can use automation to bring up and down the volume of our dialog so that the overall levels are more even.
Different streaming services have different loudness targets, which are usually measured in ‘Loudness Units Full Scale (or LUFS for short). The target for YouTube is -14 LUFS, so if you deliver something that is way beneath that, say -24 LUFS, YouTube will automatically bring up the overall level by a value of 10 LUFS. Both music and other types of media are subject to changes if they don’t meet these requirements, and I suggest reading up on the topic if you’d like to know how to deliver files that will receive minimal volume adjustment upon upload to their final destination.
In Summary
Perfect audio quality doesn’t guarantee your project will be successful, but awful audio will basically guarantee failure, at least from a commercial perspective. With so much content available for consumption, it’s important to deliver a product that doesn’t sound amateurish. There are ways to deliver excellent quality dialog without spending an absurd amount of money, as long as you are willing to put in the effort. If the idea of buying equipment piece by piece is too intimidating, it’s not a bad idea to look into beginner-level recording bundles.
I hope this article has helped. If you have any questions or comments, feel free to reach out to me via my website.