7 Tips for Getting the Most Out of One Microphone
12/28/2020
Article Content
Out of curiosity, I just googled the phrase “best microphone.” Not surprisingly, that search query turned up some pretty stupid results (none of them on this website, thank you very much). I say “not surprisingly” because asking “what’s the best mic?” in such broad terms is kind of a stupid question. Best for what? Microphones are tools, and tools are made to suit specific applications.
Can you imagine walking into a hardware store and asking the clerk, “which is the best tool?” I imagine a disaffected employee rolling their eyes, silently wondering when their next break is, and then distractedly telling you something like: “Screwdriver. The screwdriver is the best tool.” Then you’d go home to spend a few hours cursing that store clerk as you try, probably with very limited success, to cut a 2×4 with your new screwdriver.
Of course, the parallels between recording gear and actual tools don’t continue very far. And as I write this, I’m pretty confident there are far more people making great music with only one microphone in their collection than there are carpenters who do everything with a single screwdriver. If you are a self-producing artist, a single microphone suited to the sound of your own voice may very well be the only mic you really need.
But for those of us with ambitions to record more than just one voice or instrument, but with budgetary or other constraints that limit mic selection, some problems are inevitable. Stacking many tracks recorded with one mic is likely to lead to buildup of resonances in predictable frequency areas. You can also expect a lack of depth and variety in a song composed of close miked overdubs all done with one microphone. And no mic, no matter how “nice” it sounds or how much you spent on it, is going to sound great on every sound source you put in front of it.
Fortunately, just because your mic selection is limited doesn’t mean your mixes have to succumb to these problems. It just means you’ll have to get creative. Removing one variable (mic selection) from the recording process simply means that to achieve a recording with balance, nuance, and depth you’ll have to lean harder on other variables that you can still control. Here are some ideas to get your tracks crackin’ even when your mic selection is lackin’.
1. Take the Time to Get Placement Right
In some ways, being limited to a single mic can be liberating. While it may be frustrating to realize that the only mic you have available isn’t necessarily your first choice for instruments you plan to record, not having to shoot out mics means you have more time to try various mic placements. A recording where every single sound source is close miked from a few inches away is very likely to sound flat. Experimenting with mic placements is a great way to create space and depth in a mix, before any processing enters the picture.
Before you start laying down tracks, try recording a few seconds of the part with the mic in different placements and compare them. Don’t be afraid to get unconventional! You’re already bending the rules by using one microphone so widely across one song. A placement that may seem less than ideal in a more conventional setup may be just the thing to add some interest and depth to your recording.
2. Use the Room to Your Advantage
This point sort of dovetails off the last one. If you’re going to experiment with different mic placements, you might as well try some that emphasize the character of your room.
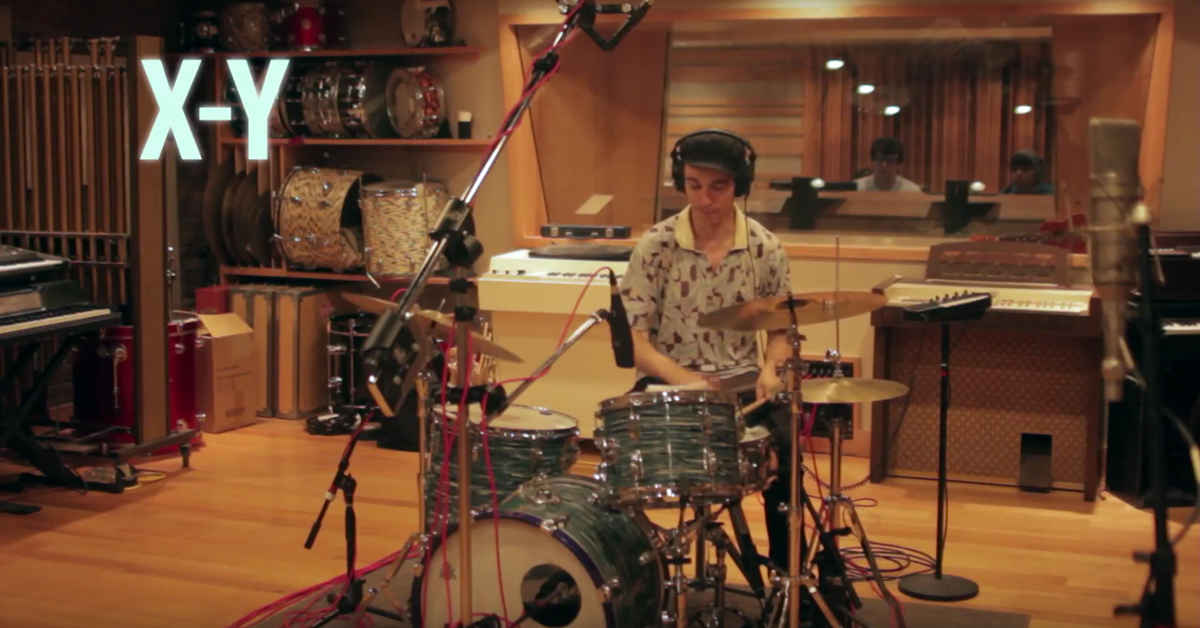
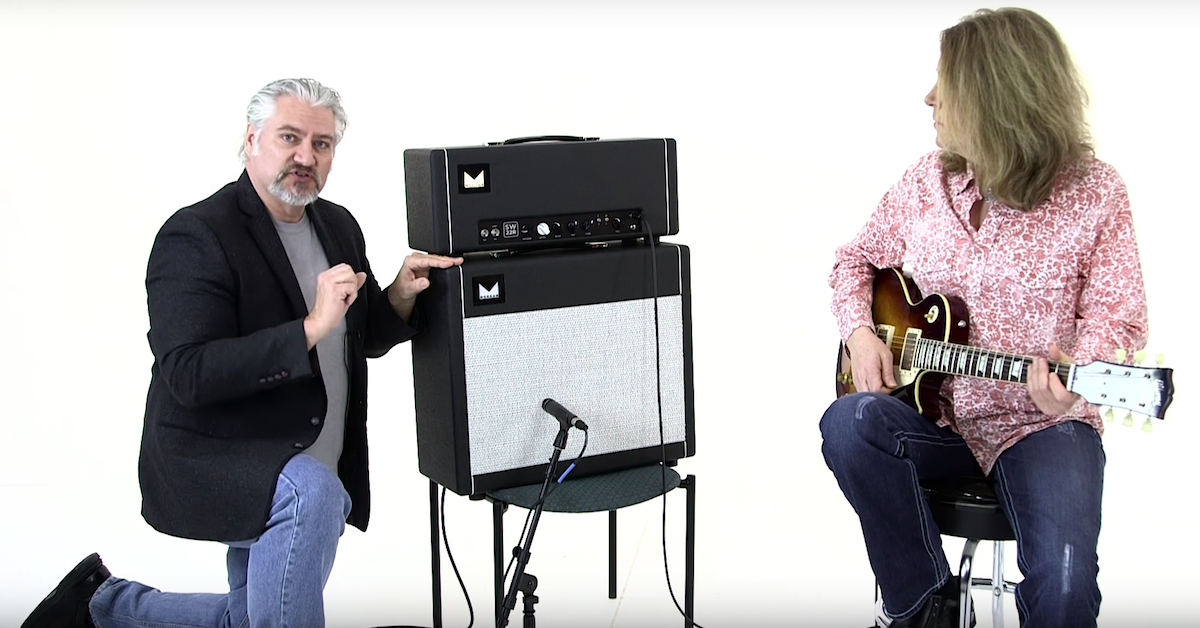
Even if your room isn’t a perfectly tuned tracking space, there are bound to be a few placements that can really help certain instruments open up. If you’re after a cavernous sound but are forced to work with limited space, a great way to cheat your way to a roomier tone is to place a mic next to the wall opposite the instrument being played, facing away from the sound source. The mic will pick up reflections rather than direct sound, giving the illusion of a larger space. I tried a placement like this in a video I did on electric guitar mic techniques. The placement in the video involves two mics, but the idea still works with one.

Tips for Recording Electric Guitar with Two Mics

Do like this, but more music and less rain. And have fun!
I often find myself having to emulate the sound of a group by stacking takes of a single performer. Some examples of this situation include simulating a backup vocal group, a string ensemble, or a backbeat clap that sounds like a whole gang of people. A great way to enhance the realism of your faux “ensemble” is to leave the mic in one place, and have your performer move to a different place in the room for each take. Then when you blend those tracks, the sum of all of them will emulate the sound of a group of people, each standing in a different place in the room.
3. Get Familiar with the Microphone’s Frequency Response Curve
Some microphones boast an incredibly flat frequency response, and others are sought after because of the way in which they color sound sources. If you’re only working with one mic, it’s better to know which category it’s in, and to use that knowledge to your advantage.
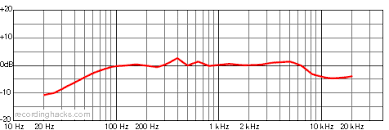
Graphs like this one (showing the response of an SM57) can provide a lot of information about the way a mic will behave:
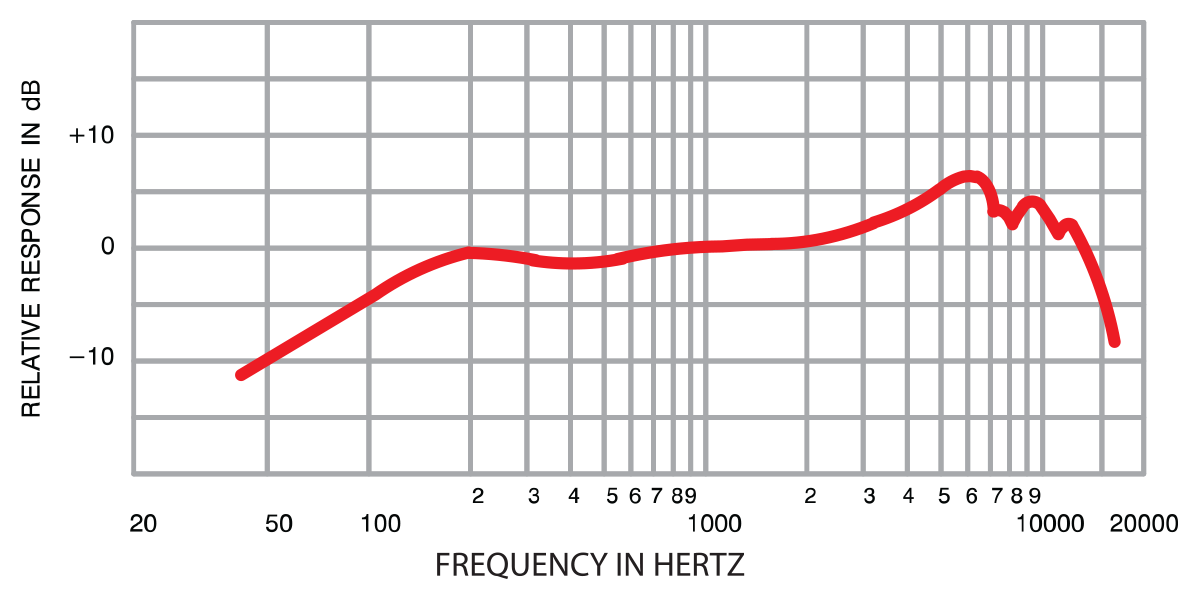
Note the low end roll-off around 200 Hz and presence boost centered around 6k
Looking at the graph above, it becomes clear pretty quickly that the SM57 will struggle to accurately reproduce low end. See how the curve tapers off below 200 Hz?
If your plan for your track involves recording low frequency instruments like kick drum, bass, cello, etc, you might be disheartened. But knowing that your mic presents a constraint there means that you can find other places to bring low end to your track. Record that drum kit with one mic, and plan on triggering a kick sample as well to bring more low end energy to your drum sound. Or mic up that bass cab, but plan on mixing in the DI to keep the bass from coming out thin. Just because a mic might struggle to reproduce a certain frequency range doesn’t mean it can’t be present in your mix — it just means you’ll have to get it another way.
4. Use Corrective EQ
Looking at frequency response charts like the one above, it becomes easy to anticipate a problem that single-mic recordists are likely to encounter: frequency buildup. You can see the potential for different types of frequency buildup in the chart for a Cascade Fathead:
The Fathead has less high end energy, plus a much beefier midrange
In addition to having a muted top end (common for ribbon mics) the Fathead’s frequency response curve makes it easy to see that muddy midrange buildup is likely to happen when stacking numerous tracks all recorded with that mic. Some instruments may benefit from that full midrange, but others may sound wooly and undefined. Either way, when recording numerous instruments in the same room with the same mic, you’re likely to hear resonances build up.
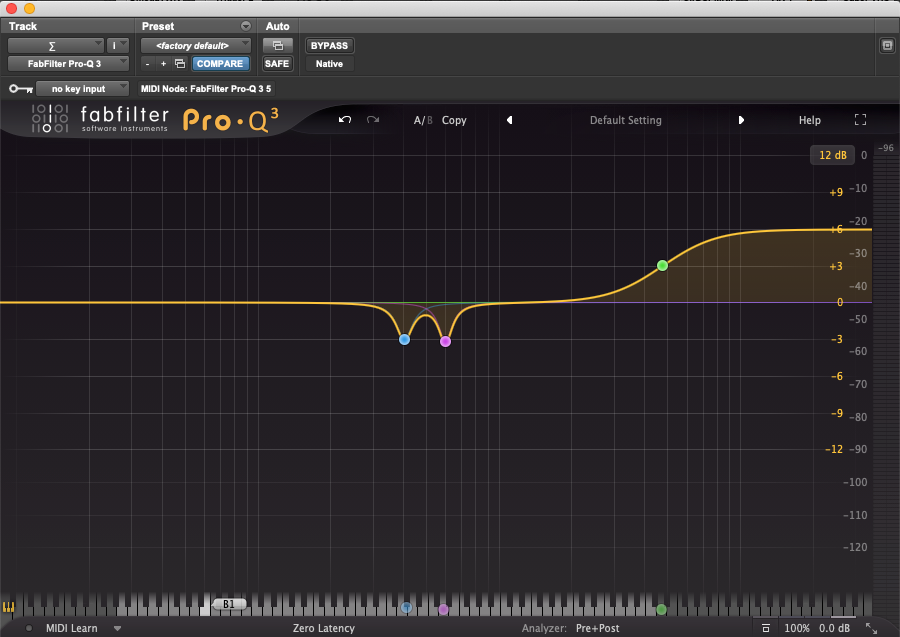
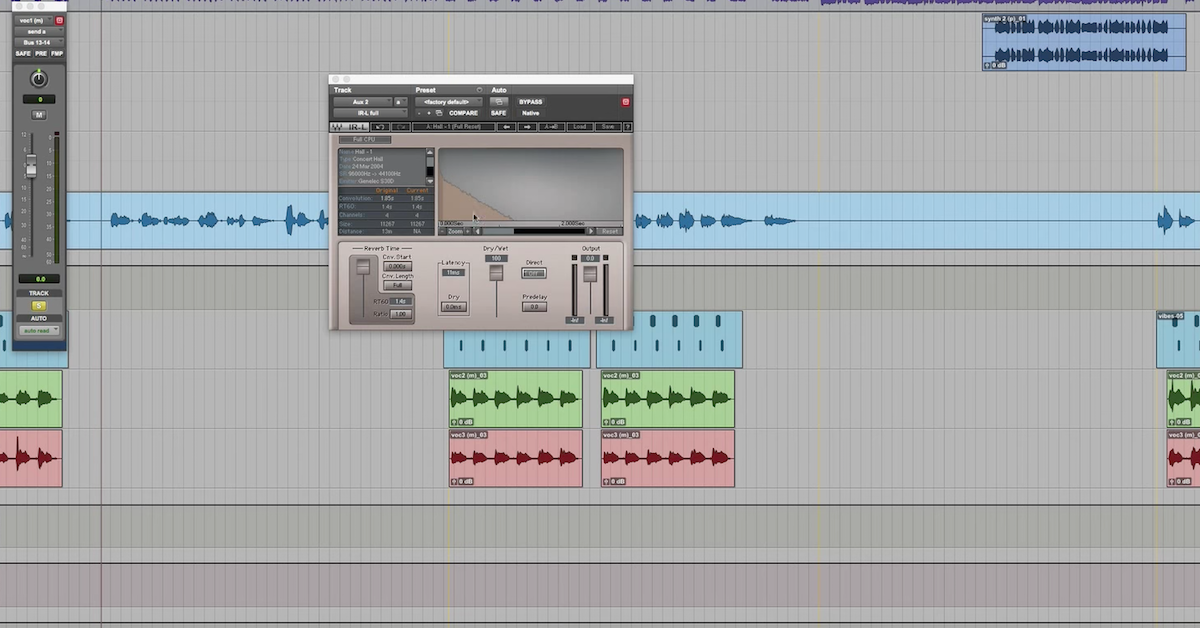
A hypothetical 2-buss EQ curve for a track recorded entirely with a Fathead
Corrective EQ cuts on your 2-buss can be a great, streamlined way to handle this sort of problem. Depending on the room, a frequency graph like the one above lets me know that I may need to make surgical cuts around 400 and 600 Hz, or else a broad scoop across the midrange. I should also expect to use generous high frequency shelving boosts to counteract the Fathead’s naturally restrained top end.

Ready to elevate your ears?
It doesn’t have to take years to train your ears.
Get started today — and you’ll be amazed at how quickly using Quiztones for just a few minutes a day will improve your mixes, recordings, and productions!
5. Use Varied Preamps and Processing
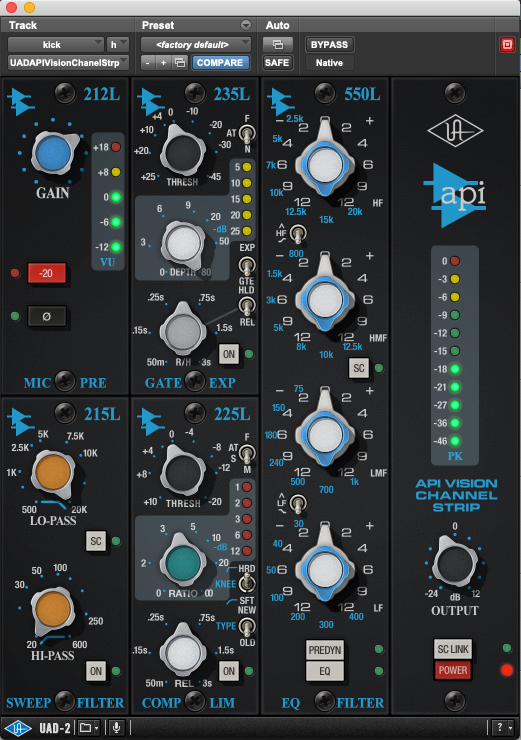
UAD’s API Vision is a personal favorite for drums
Even when mic selection is limited, preamp choice has a ton of potential to color sound sources almost as dramatically as mic choice can. I realize that it’s probably unrealistic to assume that a studio or home setup with only one mic would have multiple preamps, but there are some truly great preamp emulations available as plugins.
While applying a preamp emulation as an insert effect may not be enough to capture, say, the transient response of an API console, the harmonic characteristics of different preamps or channel strips still shine through in many emulations.
For best results, don’t be shy about driving those “pres” a bit. Preamps best show their sonic colors when they see a healthy signal. Though audibly distorting every track in a mix is probably not going to work out well, choosing certain tracks to imbue with extra vibe from a modeled piece of vintage gear is a great way to emphasize them and make them pop.
6. If The Mic Has Multiple Polar Patterns, Use Them
If I were forced to keep only one mic in my collection, it would be my AKG C414 B-ULS. It’s not my favorite mic, and it’s generally not the most exciting in my collection. But it has an honest, full-spectrum frequency response, and more importantly, four very usable pickup pattern options.
Cardioid and hypercardioid are great for typical close miking applications, while omni and figure 8 invite some creative uses that have a tendency to bring more of the sound of the room into the recording.
Even if your one mic doesn’t offer multiple polar patterns, it’s still worth understanding how to work with whatever pickup pattern it does have. If your mic has only one polar pattern, chances are it’s cardioid. In addition to the other ideas mentioned in this article, try recording with the mic off axis to get a darker, thicker tone.
7. If it Sounds Like Garbage, Lean Into It
It’s entirely likely that, when recording multiple instruments with the same microphone, some tones will simply complement the mic’s natural character better than others. In fact, some instruments will probably just sound like garbage.
I’m of the mindset that if it’s not possible to make an instrument sound good in a recording, the best compromise is often to make it sound extra bad. Destroy the track with heavy processing! Use aggressive saturation, pitch shifting, modulation, or any other studio trickery you like to completely transform it.
Maybe you wanted the sonic equivalent of steak, but the limitations of your setup mean that the track is just a bit too rough to be served up with minimal seasoning, medium rare. Screw it! A disappointing steak can still make a pretty good burger if you grind it up and serve it on a bun. (Yeah, I’m big on cooking metaphors for music production).
Granted, this approach probably won’t work out well if you plan on applying it to everything in an arrangement. But as a last ditch option, leaning into the grime can be truly transformative!
Conclusion
Though it’s less than ideal, there’s no reason having a limited mic selection means your recordings need to lack nuance. Stretching a single mic to record multiple instruments on the same song might require an investment in some new plugins, but that is bound to be cheaper than stocking your mic locker like a commercial recording studio. If your lack of mic options is bumming you out, quit shopping for gear you don’t really plan on buying and start experimenting! Chances are, you’ll find the gear you have affords you more flexibility than you thought.
Premium Mix Training