Tips for Mixing Drums with Samples from That Sound
09/11/2015

Tips for Mixing Drums with Samples from That Sound
Transcript:
Today’s video, I want to give a look at kick, snare, some drum buss processing, some stuff that I’m doing on a recent mix. I’m actually still working on this. I just finished the module on drums for my membership site called The Mix Academy. You can check that out – a little plug. Themixacademy.com. I was talking about the good people over at That Sound, and how their drum sounds make me actually sound like I know what I’m doing, so I wanted to give you an inside look into that. This song is called Arise. It’s from the good people at Maranatha Church out of Chicago, and I want to say thanks to them for letting me use it in my membership site, but I want to give you a breakdown. Let me just hit play where I’m at right now. I’m still mixing this one, so go easy on me. I’m going to hit play and let you check it out, then we’re going to break down the kick, snare, some cymbals, and the drum buss processing. [music] Okay. So, jumping right in, I want to show you a before and after of the kick and snare. To do that, let’s go to this build right here. I’m going to bypass everything. If you’re on Pro Tools, Option+Control+Shift on Mac, you can bypass every single plug-in on the chain from whichever point you’re at. So if you wanted to bypass TrackSpacer through, you can just go right there and you can bypass the plugs from then on after that you click on. A little botched explanation there, but let’s go ahead and listen to the before. [drums] Okay. For this song, it’s terrible, right? For this song, my good friend Vic Encarnacion, he produced it, and they had a time crunch, and he went with programmed drums for the uptempo songs. It’s funny, because there’s only two songs on this record that have programmed drums. The rest are played by an incredible drummer. I forget his name, I’ll have to look him up and put him in the comments. Then I’d probably end up blending some kick and snare samples anyways to try to emphasize certain things. I may want more bottom, more punch in the kick, more click, and so why not just go to samples from the beginning?
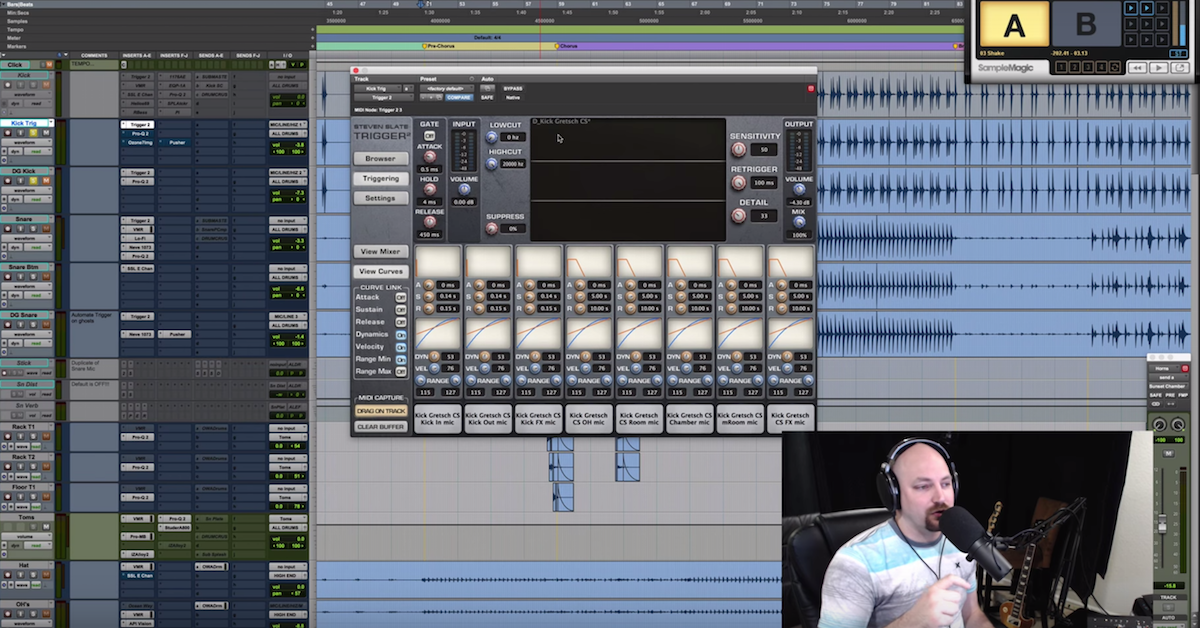
So I chose to replace them, and I chose to replace them with these samples from That Sound, and what better time for them to release their bundle called Icons done by Jeff Juliano and Nir Z, one of my favorite drummers. I followed him for quite some time through some of the other work that he’s done with some other companies, and they killed it, man. So I’m going to show off the kick that I’ve got here, and it’s a preset that Jeff did. Let me come in here to my folder, DGR, you can see I have a lot of drum samples. Look at all of the That Sound stuff. I’ve got everything they make. You can come down here to the Deluxe package. You go to presets, and I’m using Trigger, so I went to Trigger. I just went to the first one that I’ve got. So, go to kick, and I saw “A Man’s Kick.” How are you going to move on from “A Man’s Kick?” You see that, how are you going to go on and try any other samples?
So I double-clicked on that, the preset loaded perfectly, and this is what it sounded like. [kick and snare drum] I’ll get that snare out of there. [kick drum] Okay. So that’s the preset. Here’s without it. It’s a joke, right?
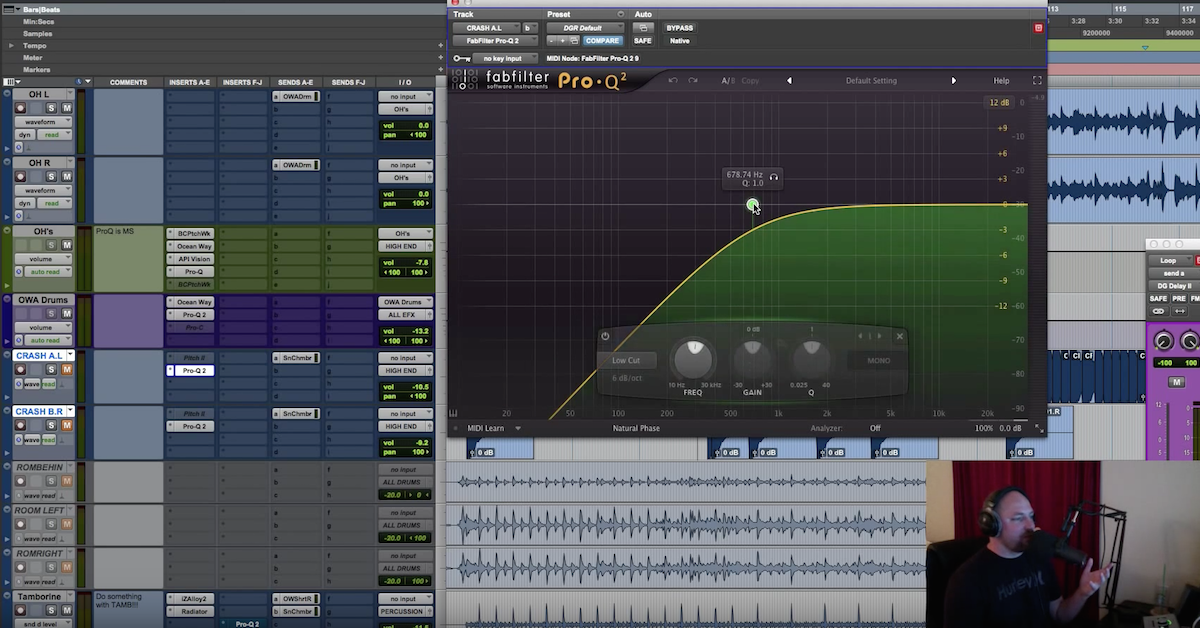
Okay, so the preset loaded and everything sounded really good. I did manipulate the preset a little bit. I don’t think I touched the faders as much as I did the curves. I went in here and I prefer a little bit tighter kick sound. This one was nice and open, so if you have a slower song, this one would be perfect for that. The decay, the sustain was all really, really nice, but I wanted to control it for this faster song. So, I’ve tightened up the sustain and the release for the up close dry mics. I left the room mics alone. That helps out a lot. Let me showcase that really quickly, because it’s not so much a tutorial on how to use Trigger. We’ve got .14 and .15 on the sustain and release. Here’s that mic soloed before I mess with the sustain and release. [kick drum plays] Okay. And then, in with the other mics. [kick drum plays + room] Pretty cool. So now I’m going to come back in – I’m going to put that back where I had it. 0.14. If I can get it to respond correctly! I’ll drag it down there. I’ll put that back where I had it. Close enough. My OCD kicking in. Then 0.15. Okay, now it sounds like this. [kick drum] Just keeping it so that the decay, the sustain cuts off before the next hit. Pretty simple stuff. Moving on from that, I want to show off the processing on the back end, and how it’s very minimal. There’s a lot of plug-ins there. Two, four, six plug-ins. But, they all serve a purpose, and they’re all pretty subtle, but I want to walk through them for you. So, here’s the kick. First of all, VMR. This is probably just VCC. Yup. Not touching anything else. I’ve got the Virtual Console. The That Sound stuff is tracked through analog gear. I see their stuff on Instagram and the way they post their marketing and stuff. There’s no reason for me to use VCC, I just had it on there because it’s my template and I left it because I liked it. But then I’ve got an EQ. For this particular song, this kick was pretty clicky and it sounded great, but I wanted to tame it a little bit to kind of fit it within the rest of the drum kit. So I’ve cut a tiny bit of sub. Just making sure nothing below 25 gets in, and then I’ve got a little bit of click. What, like a dB, a dB and a half of the two main points of the click. So here’s before. [kick drum] And after. [kick + EQ] Again, just taming it a little bit. You can hear it’s a pretty subtle difference.
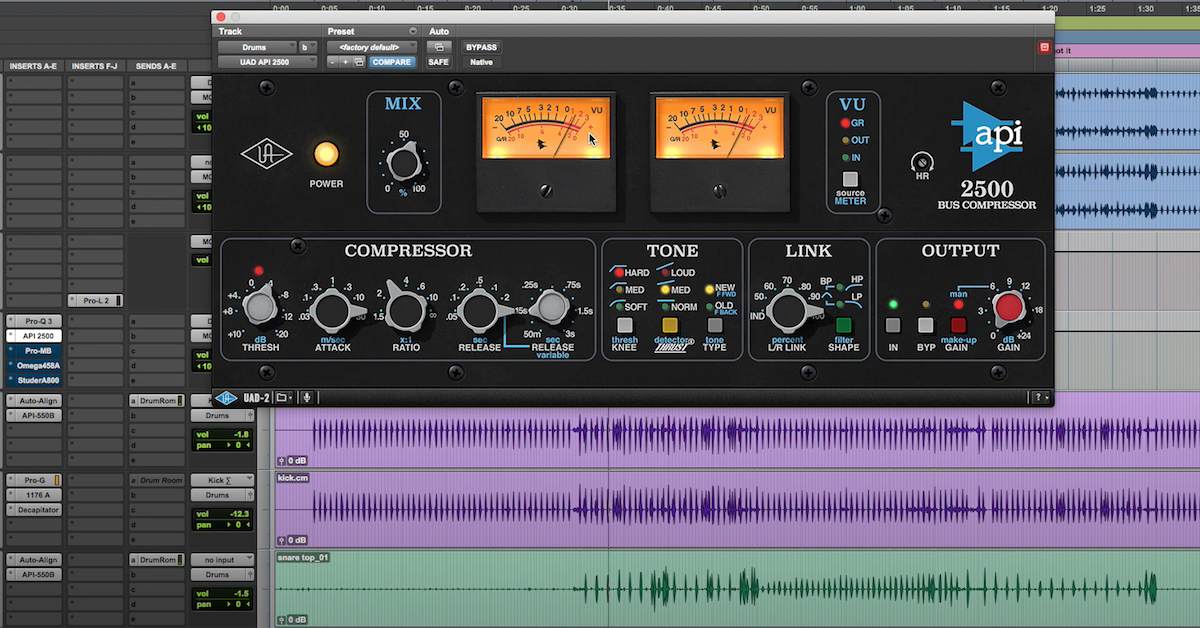
I’m going to leave Track Spacer alone, I’ll come back to that once we talk about the snare. Pro-MB I used as a quick EQ just to boost a little bit of sub. I referenced another track from the church out west in California, Bethel Church, and I felt like I could use a little bit more sub, so for this song I boosted that. I used this as an EQ. No compression. Here’s without it. [kick drum without FabFilter Pro-MB] With it. [kick drum with FabFilter Pro-MB] Subtle stuff, right? Then moving on from that, I’ve got my friend Alloy 2. It’s hard for me to not use this in a song because I love what this does. Again, I’m going to show you the processing before and after and you’re going to kind of wonder why I did all this, but just to add a little bit of punch to the sub, and pull out just a little bit of sustain from that 125 and below. Here’s without it. [kick drum without iZotope Alloy 2] Then with it. [kick drum with iZotope Alloy 2] Just to try to take command of that low end a little bit more and I dug what that was doing. Then here with Ozone Imager I’m just pulling 140 Hz and below down to make it mono. I used the mono to stereo instance of Trigger so that I can take advantage of the beautiful stereo image that the guys over at That Sound did when they captured the kick drum. The room sounds, the overheads, all of that good stuff, but I want the meat of the kick, just the OCD in me to live in the mono realm. So, I sucked all of that down to be completely mono. So the difference between that is this. [kick] Just focuses the low end in the middle. Nothing big there. So, okay. That’s kick drum land, as Jonathan Roye says over at Mixnotes.tv. Give a shoutout to him. Then snare drum. I’m going to show you the before again. [snare] Okay. And then Trigger with That Sound’s Fat Beauty preset. Let’s come over here and showcase that off. We’ll go to my folder again really quick. Go Near Z and Jeff Juliano. This is again a Jeff Juliano preset. We’ve got Trigger. How easy is this? Snare, bam. Fat Back Beauty. I knew it was a Black Beauty. I love a Black Beauty. I think it sounds great. It fits most styles of what I mix, and so I double clicked that. Again, the only tweaking that I did was to the curves of the direct mics to tighten that sound up a little bit. There was a ring that was in the snare that I didn’t want, so I pulled that back with the decay and sustain, and now the snare sounds like this. [snare] Okay. And you can hear the dynamics changing a little bit, I’ll quickly show you that. To help Trigger to trigger accurately, I’ve used Clip Gain in Pro Tools. I threw break points and just – you can see that, if you zoom in here a little bit. I’m pulling each of those hits up to make sure they trigger accurately, then if I show you the volume automation, I’ve got kind of a crescendo there so it builds to help it sound a little bit more natural. The snare sounds great, but I wanted that to fit in the track and build a little bit more. So then VCC again. This is probably nothing, but… Yup, VCC. And it’s just the default, checking my gain staging, and then I did add a little bit of shelf, a tiny bit at 7.2kHz, then a little bit of meat to fit this song. I like deep, fat sounding snares, and so this is pretty much just to help the snare shine a little bit more on top. Not even necessary, really, but here it is. The before and after of this. [snare drum, before and after processing] Cool. Moving on from that, I wanted a little bit more, so I went to the Blue Cat’s Patchwork, and I pulled in the UAD 1176. You’ll know if you’re a UAD fan, we don’t have a mix percentage knob on the 1176 bundle. So what I do is I pull it in through Blue Cat’s Patchwork, and I’ve got the mix percentage knob right there. So I just kind of blend in some parallel compression so I don’t have to duplicate the track. You could, if you didn’t have Blue Cat’s, you could duplicate the track, throw the 1176 on it, then just use your fader, and that would act as a mix percentage knob, but I love what these guys at Blue Cat have done. Blue Cat audio, so. Anyways, here’s the before and after with the parallel compression. [snare, before parallel compression] Okay, and with it. [snare, after parallel compression] Just fattening up. Getting the room sound nice and tight – not tight, open. Making it sound cool. [drum mix] Okay. So it’s nice and full, the kick drum is almost dominating the snare whenever the snare hits. You’re just kind of hearing the ring, but I want to get more of the transient from the snare, so here’s with Track Spacer. [drums] And without it again. [drums without Wavesfactory Track Spacer] Cool. That’s a big difference for me. It’s subtle, but I feel like I can really feel the snare dominating them whenever the snare is coming in on two and four, and that’s better to my ear, because I’m retaining the sub, the low end below 108 Hz, but I’m getting the punch and the click from the snare – click in the snare… But you know what I mean. The attack of the snare overpowering the kick just a little bit to make sure that it’s featured on the two and the four. So, that is how I treated the kick and the snare. Let’s come down and take a quick look at the buss processing, because that makes a difference. You’ll know, I do the all drums and a drum crush, and so on all drums, my kick/snare/toms go through to the all drums buss. I let the overheads, the hat, the ride, any reverse cymbals, crashes, and of that kind of stuff go to a buss called “high end,” where it doesn’t get any compression. I do my parallel compression and my distortion/saturation and that kind of stuff to the shells of the kit only. Something I picked up from Dave Pensado however many years – a couple of years ago, and ran with that. I love what that does, so I’ve got FG-Red, just for the drive control. I’m not even compressing with this, which goes into Pusher from Kush Audio. A little clarified transient to kind of snap things up a little bit. Then I send from all drums into the drum crush, and the crush is VMR, just VCC’s mix buss. Nothing fancy there. This isn’t even on. The 1176 there. But I used the Waves dbx 160. I’m a UAD fan, but the Waves did it right with this dbx, so I use this one. I love what this is doing, and I’m just smashing the junk out of this one. I followed that up with the UAD Thermionic Culture Vulture, and I’ve got a preset, “Crunchy Frog Drum Buss.” Don’t even know what that means, but 25% or so of this. You could push this even harder, it sounds really cool. For this song, I felt like it was serving the song better around 25-30%, and those are the drums. Let me show you pre-drum crush. [song] And, probably would work better to – let’s actually just feature the drums so I can turn off vocals. Turn off the percussion, turn off the bass and the music so I don’t get her vocal processing on the back end, let’s mute those and we’ll go ahead and mute the bgvs. [drums] Okay, so this is no drum crush. And with it. [drums with drum crush] Cool. So we’re getting body, we’re getting punch, getting a little bit of click in the kick, and it sounds awesome to my ear. The other thing I wanted to note in this tutorial was blending cymbal samples. I’ve talked about this a ton, but I can’t stress it enough, especially for impact at parts where the song is building, and then it kind of just explodes, I want to make sure it has some extra impact in there. What better way than to use some crash cymbals?
So I’ve got a left crash, a right crash… I pulled these from the That Sound library. Actually, the same one. The Icons bundle. It’s a crash one and a crash two. I pulled the big highest velocity in, and rocked that here, so check this out. Then I did tame a little bit of the 4kHz or so on the second one. Just ringing a little bit to my ear. Then I send those to a Sunset Chamber, and it sounds like this. Here’s actually without them in the song at this part. [drums play] Okay. And then with them. [drums play with cymbal samples] Huge difference. Probably would feel even better if we come in here and we unmute this stuff so you can get perspective of what blending crash samples in could do. Now, I’ve actually gone through – I have a tutorial where I feature blending crash samples for every single crash in the song. There’s a crash/ride section in the tutorial, and I did just layer and it sounds horrible by itself, but whenever you put it in context, it adds a really nice layer. So here’s this same section with all of the band in. [mix] No, right? So weak. Now check. [mix, with samples] Huge difference. Not much more to say about that, so. I’m a big fan of replacing drums. I’ve done it for a long time. Kick, snare, it makes it pretty easy. If I get a producer who spent a lot of time in the studio swapping out kicks and snares and stuff, I’m going to respect him first, and I’m going to give those a shot, but man. The guys over at That Sound are making it really easy for us, and this makes me money. As a mixer, that’s a huge point to make. When I can just pull open a couple of presets, see what fixes a song the best, and run with that, tweak it to taste a little bit, that’s going to help me get from a to z a lot quicker, and nobody is doing it better than the guys over at That Sound, in my opinion. All kinds of things to come from The Pro Audio Files and David Glenn Recording. Thanks for taking a listen and checking this out. I hope you enjoyed it, and we’ll catch you soon.
But he programmed these, and I think he used Native Instruments Modern Drummer or something like that, and so pretty lackluster and would need a lot of work. If I were to try to use these drums, I would first of all have to probably do some hyper processing. Go through and just trial and error and try to make some stuff happen.
So anyways, there’s kick and snare. Now the beat goes to a four on the floor, with kick and snare hitting on the two and four together. What I did – typically, on a four on the floor beat, what I’ll do is I’ll go in and pull the kick drum down a couple of dB when the snare and the kick hit together, but because of the great work of the people over at Waves Factory in creating Track Spacer, what I did is I set a frequency response from 108 Hz and above to be ducked down on the kick drum when the snare hits, so I’m side-chaining the snare into the kick so that the snare will push down the click of the kick, the 100Hz and above. So that sounds like this… Here’s before, at the four on the floor groove.
So go check them out. Iwantthatsound.com. If you haven’t done so yet, check out the free mix training bundle at davidglennrecording.com. You get two sets of multi-tracks, a whole slew of impulse responses, a couple of free video series training on mix prep, and working with 2-tracks and some other stuff.